Thursday, August 29, 2013

Fused Glass Firings with Broken Glass - Three Pieces

I was so pleased with the results of yesterday's firing. I redid the first plate by adding more glass in the lower left corner and it turned out great! It actually fired smoother.


Here are the second and third pieces.


And two close-ups of the beautiful glass!


My next step will be to prepare three molds to slump these pieces. Since it's another hot, humid day in Southern California (humid here?!!) and unbearable to work in the garage, might as well fire these today. Can't wait to see the results!

Wednesday, August 28, 2013

Fitting into Tight Places ..... Hilarious!

This link is so funny. I had to share it !!!

https://www.facebook.com/photo.php?v=10200387320826253&set=vb.1252454892&type=2&theater

Fused Glass Firings with Broken Bottles

I've seen so many plates, bowls, even crosses, made using broken bottle glass and have wanted to try it for a long time. My friend recently gave me a few pretty light green Pellegrini water bottles and they are perfect for this project. Here is my first attempt. I remembered that bottle glass needs a higher firing temperature after doing wine bottle rings a year ago. It took forever for the sharp edges to soften. I had a few notes and fired this broken bottle piece to 1520 deg. F. It fired perfectly except for the lower left edge where the glass needs a little reenforcement.


This morning I added a few pieces of glass to that corner. I also did two more bottles. There's no easy way to do this, unless you want to glue each piece together! My first piece turned out to be a 7" square, so I cut fiber paper a little larger. I started with the edges and here is my original piece on the top with my second one underway.


You can see by my third piece on the right that the broken glass pieces got a little larger. Ha. Actually the larger pieces were harder to control than the smaller ones. Just one little slip of the finger topples an area that you've done. This takes a lot of patience. I was not feeling patient. And it was already hot as blazes in the garage so that did not help. But the pieces looked good when I started the kiln, and will keep my fingers crossed that they fire perfectly. Will post a photo tomorrow of the results.


Monday, August 26, 2013

My Latest Disc Project

If you read my earlier post last week where I shared my Birthday Present to myself, you saw the discs I cut with my new Swanstrom Disc Cutter. The inspiration came from Barbara Lewis's torch fired pieces in her video and book.

Let me tell you ... it wasn't as easy as it looks. I would like to say that I am not a mechanical person, but usually find a way to make the piece work. My pieces below look like they came out of a war zone, but I'm not finished yet! And hopefully the opaque enamels will cover a lot of the marks made by hammering. In this case, my idea of etching is out. Here are some of the pieces I worked on.


The main problem I had was my dapping blocks. They didn't have the correct cavity size to make the last deep "dapping". Those little cups really suffered with lines around the edges because the cavity was too small for them, as well as getting stuck in the hole.


The two photos above show the pieces from the top with the domed disc sticking through. The two photos below show the back. I will smooth the edges of the domed pieces so they will look and fit better. Poor things. Both front and back will be torch enameled. The domed discs will adhere to the outer pieces with enamel acting as a "glue". What a great design! And such an inspiration for future projects.


Sunday, August 25, 2013

Etched Hearts

I cut out a few hearts from one of the larger etched copper pieces with Deborah Read's zentangle stamp. I applied patina to two of them. They are far from being finished, but I think they will turn out very nice.

Saturday, August 24, 2013

My Special Birthday Gift ... to myself!

I recently got out Barbara Lewis's book, "Torch-Fired Enamel Jewelry", and watched her video, "Creative Torch-Fired Enamel Techniques". The bracelet she made in the video was sooo great and really got me inspired. I started cutting discs using my old disc cutter, as well as sawing larger circles with my jeweler's saw that could not be done with my disc cutter. After 30 minutes of sawing, I looked at my poorly done circles that still needed lots of filing and sanding, and I stopped. My right shoulder that has 3 tears and is living on borrowed time, was starting to hurt. I made a decision, and although it's a month early, I ordered myself a very special birthday gift that arrived yesterday.


Yes, the Swanstrom Disc Cutter, as well as the Center Positioning Dies!

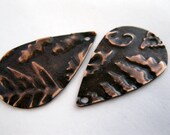
Last night I got out some of my recycled copper sheet -- it's from the scrap bins at Industrial Metals nearby -- scratched, but easily cleaned and smoothed with sanding -- and used my left arm to easily cut out these discs that will be used for pendants and for making a bracelet. The tiny circle is first cut out to make the hole in the larger piece. You can save this little disc for future use -- bead cap perhaps? The metal is then placed under the large hole of the disc cutter so you see the tiny circle cutout. Using the positioning die for that hole, you center the circle exactly, tighten the clamp on top, remove the positioning die, insert the large punch, and it's time to strike the punch for the perfect component. So easy! I made about a dozen. The copper disc on the left becomes the center element for the piece. Hard to imagine now, but if you have the book or video, you can follow along. And I'll show you in my next step.


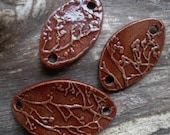
Today's a new day. I'll work on the doming parts and show you what's happening in a later post. These pieces can either be etched or enameled or the two processes combined. It's an exciting project and having fed the dogs and myself, cleaned up, paid some bills, etc., I have the afternoon free to play!

"Beautiful Shades of Brown" Treasury"

One of my favorite bowls is featured in this very nice Etsy treasury. Lots of great pieces.

'Beautiful shades of brown' by PlantArt


amber in a cage - industrial...
$600

12x18", Cut Wildflowers...
$50

Antique Early 1900s Leather ...
$16

Leather and Sterling SIlver ...
$42

Dangle Earring Lacy Filigree...
$16

Sexy White Chocolate Sandalw...
$6.5

Tree of Life Painting - Bird...
$43

Ring Dish Stoneware Ceramic ...
$18

Pietersite Gemstone Pendant ...
$35

Crystal Topaz Beaded Spider
$18

Brass and copper sunflower e...
$30

Stoneware Bowl Wheel Thrown ...
$30

Paisley Play Notebook
$25

A Toast To Life, wine art on...
$385

Linen Cotton Tote Bag phone...
$19

A Rustic Old Landmark Church...
$65

Sponsored by send bulk email from excel.