It's been cool enough the last few days that my energy level has gone up! And cool enough to work in the garage and be creative. I've been wanting to try two techniques where you sift powder directly onto glass using a stencil or dry leaves. Bullseye has videos of these processes that are very helpful.
My first projects were done with a wonderful bamboo stencil. I made two similar plates, so I'll only show you one. I first made masking tape handles for the stencil so it could be easily removed from the glass. I used French vanilla glass and dense white powder for these pieces. In this photo, the stencil sits on the glass piece, ready to receive powder.
I've sifted the powder onto the stencil.
Well, the stencil wasn't that easy to remove, as the powder weighed the stencil down so lots of it fell off and the powder image was not crisp. I dumped several stencils of powder and finally got a fairly good image. Next time I'll try adding BBQ skewers or a cardboard frame around the stencil to make it more sturdy, less droopy.
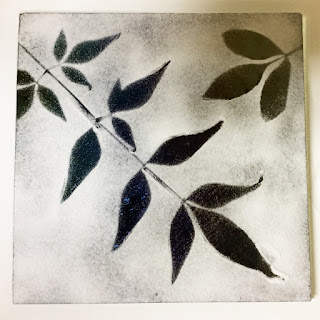
My next project was done with dried leaves I've kept in old catalogs for years. I used dark iridescent glass, added the leaves and sprinkled clear powder over the entire glass piece. Removing the leaves was a little easier than the stencil, as long as you kept a stem off the glass so you could lift up. Needless to say, lots of powder was dumped here too, as you can see! Here the powder has been sifted, the leaves removed, and you can see the iridescent glass showing.
The four pieces all got clear glass bottoms, and here they are in the kiln waiting to be fused.
Here they are after cooling overnight ... and looking pretty good!
Sunday, August 23, 2015
Saturday, August 8, 2015
Simple Sesame Noodles
Every once in a while I post a recipe I love. Today I would like to share a recipe from The Pioneer Woman.
SIMPLE SESAME NOODLES!
This is sooo good by itself. Of course, you can add to it or serve with your favorite BBQ treats. Great for bringing to potlucks too. My personal preference is using angel hair pasta ... and I use only half the box with the recipe.
Try it and let me know if you like it!!
SIMPLE SESAME NOODLES!
This is sooo good by itself. Of course, you can add to it or serve with your favorite BBQ treats. Great for bringing to potlucks too. My personal preference is using angel hair pasta ... and I use only half the box with the recipe.
Try it and let me know if you like it!!
Wednesday, August 5, 2015
TUCKER TOOL SHOT PLATES
I love new tools! Yesterday I received two Tucker Tool shot plates that I ordered from Indian Jewelers Supply. I first saw them demonstrated in a video by Leslie Villareal on YouTube and knew I had to have them. I need more tools! Here is a photo of the shot plates.
Seriously, I have had the urge to start working with sterling silver again. I still love copper, but wouldn't it be fun to combine the two metals or make a bunch of sterling silver earrings for myself! Yes!
If you watched the shot plate video demonstration, you'll see you need to gather your silver scraps and melt them into perfect little balls. So much fun. BTW, she demonstrates the shot plate at the end of the video.
So the first thing I did was get out my new charcoal block and made some little piles of silver scrap.
Magically the heat of the torch formed the silver into balls.
These were so small that I made more with bigger piles of scrap.
Then a third batch .....
They were finally getting to be the right size for the larger depressions on the shot plates. So I tried a couple. First putting the round side of the ball into the depression and hammering the top flat.
Here are two finished ones. A little blurry.
It's harder than it looks. I need way more practice with the larger ones. The third piles of silver were a bit too large, so I'll try again tomorrow .. in the cool of the morning. But I managed to get a few done, so I have a few decorated balls and a few plain ones. The nice thing is, they all have a flat bottom which makes it easier to solder them to your projects.
Tuesday, August 4, 2015
QUILTED TABLE COVERING
WHAT?!!! "Quilted Table Covering"? Yes, I have attempted to make a quilted table covering for my round oak table. My friend Marlene has a quilter friend in MN and you should see the quilted pieces she has that were gifts from her friend! They are beautiful and are all made using dark fabrics ... perfect for my taste.
When Marlene left for her summer vacation, I asked if I could photograph my favorite so I could try make it. I was sooo excited when she gave it to me to keep while she was gone! I wanted to magically duplicate it, but finding similar fabrics was impossible. And having no experience didn't help ... but I learned so much by watching tons of quilting videos on YouTube.
So where did I start? It started with a trip to explore Hobby Lobby with my friend Ellinor. I couldn't believe they had fabric. I bought a few fat quarters that I thought would work in my project. Then I visited the local quilting store to try match some of the darker fabric. They gave me hints as to where to look on line, and I found some 5" squares and yardage to order. Then finally a trip to JoAnn's nearby. Hmmm ... I wonder how much I've spent so far. Enough for several table coverings and more, I'm sure!
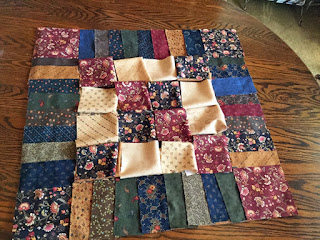
The cutting began. I cut some of the 5" squares in half and cut 2-1/2" x 5" pieces out of the other fabric. These would form the border. Then I started spreading the pieces on my table to see how it would look. A real mess! The real problem was the center and how to place the larger squares. I tried all combinations and none of them looked great. I didn't have the right colors. Marlene's table covering had appliqué work, and I was not going to attempt it with this first project. Maybe in my next one (????). Here are a couple layouts. So many photos were deleted....
I started sewing the smaller pieces to form the border around the center squares. The project was going to be 22" to 24" square. Then I sewed a strip of the 5" center squares. To my shock, the seams didn't match with the 2-1/2" pieces sewn together! They were too big. DUH! A senior moment. I had to cut the 5" squares into 4-1/2" squares. Then everything was okay.
It was a real learning experience, and I finished the project. I learned how to "sew in the ditch", create a binding. The next time I attempt this (!!), I'll make a 2-1/2" binding instead of 2". It would look much better. So here is the quilted table covering. Not perfect, but useable. I wish those center squares weren't so bright. The back is nice ... I can always turn it over on my darker days ...
Subscribe to:
Posts (Atom)


