
Wednesday, January 15, 2020
A FEW FINISHED OLD COIN BUTTONS!
Yesterday I dressed warmly and ventured out into the cold garage to solder on the button shanks. All went well. I tumbled the finished pieces for an hour or so, and they are now really really shiny and bright. I'm thinking of adding a liver of sulfur patina to a few to see how that would look. It would highlight the images and printing.


Sunday, January 12, 2020
MAKING BUTTONS WITH USED COINS
The last time I posted here was in December 2018....I can't believe it! It certainly doesn't seem that long ago, but as we all know it...time goes by super fast. My friend Ellinor and I did so much enameling during the summer when the garage was super hot. Now it's super cold (okay, so it's only in the 50's). The next step in my new button-making project is soldering, and that is done in the garage. Brrrr...
So what inspired this? A couple months ago I read several posts from Kate Richbourg, a well-known metalsmith, and she showed photos of the buttons she was making with used coins. They are beautiful! Check out her website katerichbourgjewelry.com So I ordered buttons from a couple suppliers and will show you what I've done so far. Hope this will excite a few of you too!
Here are a few of the buttons. Pretty grungy looking, aren't they? I wondered if I should anneal them first before doming. I decided just to go ahead... and not go out to the cold garage! It worked out all right, although I'm sure annealing the metal first would make doming easier.

Here is what I used....a metal doming block with a couple dapping punches and a brass hammer.

So what inspired this? A couple months ago I read several posts from Kate Richbourg, a well-known metalsmith, and she showed photos of the buttons she was making with used coins. They are beautiful! Check out her website katerichbourgjewelry.com So I ordered buttons from a couple suppliers and will show you what I've done so far. Hope this will excite a few of you too!
Here are a few of the buttons. Pretty grungy looking, aren't they? I wondered if I should anneal them first before doming. I decided just to go ahead... and not go out to the cold garage! It worked out all right, although I'm sure annealing the metal first would make doming easier.

Here is what I used....a metal doming block with a couple dapping punches and a brass hammer.

Saturday, December 22, 2018
NIGHT LIGHTS
Wow, I see my last post was in September! You would think I've been a busy girl. Yes and No. September was around the time I had cataract surgery on my right eye. After a few weeks, I had the other eye done. Then I had to wait for new glasses. Before I got the new glasses, I participated in two craft shows. Writing those tiny labels was the hardest thing. But all is well again .... my vision has really improved.
My friend Drewcilla is an exceptional glass artist. She has been making custom night lights for years, selling them in her Etsy shop. Recently she started using fusible decal paper by Bullseye. She used a black and white printer to transfer the images to the decal paper. The images were then fired on glass, and they fired to a lovely sepia tone. How simple could that be, I thought. I have a black and white printer that I've used many times for etching images on metal, so I was pretty confident it would work. You can imagine my disappointment when I opened the kiln door and saw pieces of glass with NO IMAGES on them! I tried it a second time with the same result. So it was time to buy a new printer!
After wasting many sheets of the decal paper and getting some technical assistance from Canon, I finally managed to get three successful pieces printed and fired.
 These are my dogs Sarah and Sammy. Sarah, on the left, is a poodle mix and is 14 years old. Sammy is a rescue dog I've had for a few months. He's two years old, is wild and crazy, and has brought so much fun and joy to his new home. He and Sarah play constantly.
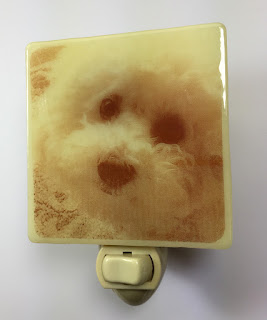 This is Sarah again. She is beautiful.
 This is Charlie, who we lost earlier this year. Such a sweetheart.
This was a great project! If you are interested in making night lights, I'd be happy to share my information with you.
My friend Drewcilla is an exceptional glass artist. She has been making custom night lights for years, selling them in her Etsy shop. Recently she started using fusible decal paper by Bullseye. She used a black and white printer to transfer the images to the decal paper. The images were then fired on glass, and they fired to a lovely sepia tone. How simple could that be, I thought. I have a black and white printer that I've used many times for etching images on metal, so I was pretty confident it would work. You can imagine my disappointment when I opened the kiln door and saw pieces of glass with NO IMAGES on them! I tried it a second time with the same result. So it was time to buy a new printer!
After wasting many sheets of the decal paper and getting some technical assistance from Canon, I finally managed to get three successful pieces printed and fired.


This was a great project! If you are interested in making night lights, I'd be happy to share my information with you.
Sunday, September 16, 2018
ACRYLIC ENAMEL COPPER FLOWER EARRINGS!!

Looking through the many classes and videos I've purchased, I saw one on Craftsy I wanted to try ... "Torch-Fired Enameling: Luscious Color & Design" by Barbara Lewis. I ordered the acrylic enamels in a set of 9 and the decals used in the video. I loved the flower Barbara made ... but I think she used an enlarged version of the decal for the video. I'll ask her if I can order a larger set.
The first thing I did was copy the sheet of decals and then cut and glued the flowers onto my copper sheet. In the video she used double-sided tape and adhered the decal directly to the copper to saw out the form. Here's a photo of part of the sheet of decals and my cut copper pieces.

Then I torch fired several coats of white enamel to each copper flower. The next step was to add each flower decal to water until it started to slide off the sheet and then try get it safely onto the copper flower. It got easier. I found if the decal folded, I could slip it back into the water and miraculously it opened up ... so I could try again. Each finished piece was then blotted with paper towels and left to dry.

Later that day I fired on the decals with my torch until I thought they were done. For some reason I didn't take a photo, but I liked the effect with the sepia tone on the white background. Then I painted each flower with the acrylic enamels, trying to follow her example. Ha. They were left to dry overnight.
This morning, I torch fired each piece and they aren't bad! They don't look like Barbara's, but I like them. The last step was to add a transparent enamel which gave the pieces a glossy coat. They did improve, but they don't show the lines of the decals. So my enamel was too heavy (not "painterly") or I overfired. Next time. I lost one copper piece back when I fired on the white enamel, so I have three pairs of earrings. What do you think?

Wednesday, August 22, 2018
EMBOSSED COPPER NAPKIN RINGS
I've made several sets of napkin rings over the years, and this week sold my last pair through Etsy. Usually I have saved notes for various projects, but had none for these. What gauge copper to use? Do I anneal the metal first? Fortunately, I have a file drawer full of scrap copper gathered through the years from our local supplier, Industrial Metals. Bins of small sheets of various gauges that you can buy by the pound.
I have this very old Vintaj Big Kick machine to use for this project.

The metal piece is placed into an embossing folder and fed through the rollers on the platforms provided with the machine. It's a craftsy-type rolling mill that is usually used for paper and scrapbooking projects. But works well with thinner gauges of metal.

Here's the embossed metal piece. Looks great!!

After rolling out four pieces, I trimmed the corners, sanded the edges, and shaped them around a mandrel using a rawhide hammer. This work hardened the metal.

I'll make a few more sets with different patterns and then decide whether to patina them with liver of sulfur or leave them this beautiful copper finish. I'll then treat them with a gloss or satin spray to protect the surface.

I have this very old Vintaj Big Kick machine to use for this project.

The metal piece is placed into an embossing folder and fed through the rollers on the platforms provided with the machine. It's a craftsy-type rolling mill that is usually used for paper and scrapbooking projects. But works well with thinner gauges of metal.

Here's the embossed metal piece. Looks great!!
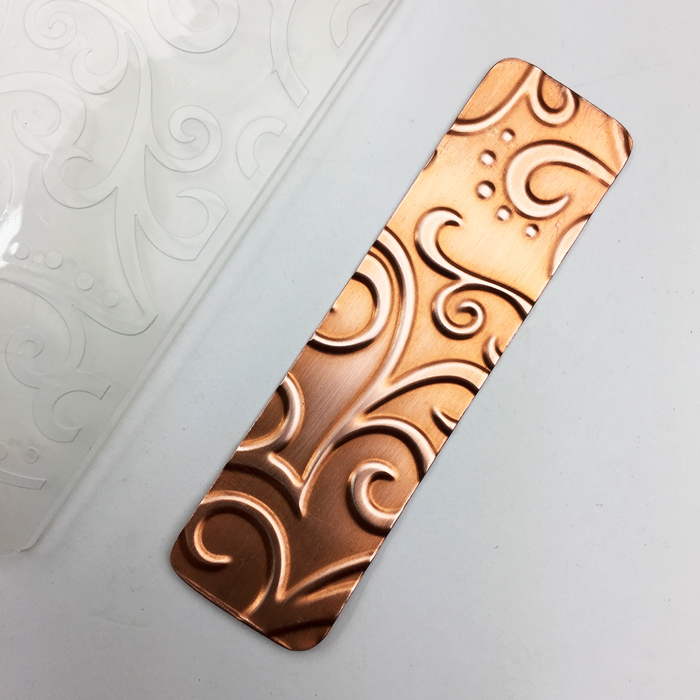
After rolling out four pieces, I trimmed the corners, sanded the edges, and shaped them around a mandrel using a rawhide hammer. This work hardened the metal.

I'll make a few more sets with different patterns and then decide whether to patina them with liver of sulfur or leave them this beautiful copper finish. I'll then treat them with a gloss or satin spray to protect the surface.

Thursday, August 2, 2018
MANDALA EARRINGS
I recently took an online class with Leslie Kail Villarreal. She is a very good instructor and provides supply lists and videos of each project from start to finish. Her website also has a lot of free videos on various jewelry projects.
This class was "Mandala Earrings". The earrings were fabricated from sterling silver sheet. She provided a template of the earrings. It was glued to the silver sheet and a jeweler's saw was used to cut out the pattern. Sounds so simple, doesn't it? It was easier than my last post on Lotus Flower Earrings, because the areas to saw were much larger. I've made three pairs so far and am happy to announce I sold one!!!!
The first pair I made is the one on the left, below. It measures 2-1/2". The smaller pair is 2-1/8". In the class, Leslie soldered a silver ball on each earring tip. The pair I sold was finished that way. I like the earrings either way, probably better without the balls.

This class was "Mandala Earrings". The earrings were fabricated from sterling silver sheet. She provided a template of the earrings. It was glued to the silver sheet and a jeweler's saw was used to cut out the pattern. Sounds so simple, doesn't it? It was easier than my last post on Lotus Flower Earrings, because the areas to saw were much larger. I've made three pairs so far and am happy to announce I sold one!!!!
The first pair I made is the one on the left, below. It measures 2-1/2". The smaller pair is 2-1/8". In the class, Leslie soldered a silver ball on each earring tip. The pair I sold was finished that way. I like the earrings either way, probably better without the balls.

Thursday, July 26, 2018
LOTUS FLOWER EARRINGS
A pair of my newest earrings ... Lotus Flowers. These were fun and challenging to make. A pattern of the lotus flower was glued to sterling silver sheet. A hole was drilled in each section I wanted to remove in order to insert the jeweler's saw blade and carefully saw out that section. Then came lots and lots of filing and sanding. Jump rings were soldered on for the ear wires and for the dangling pearls. I really like these earrings. I know my sawing skills improved making these .... and in making the mandala earrings I'll post in a day or two.


Saturday, July 21, 2018
NEW EARRINGS!
It's been a long, long, long time since my last post. No excuses, just a creative slump. I'm sure it happens to everyone. Anyway, since our Southern California weather has been SOOO HOT lately, I've been staying inside and keeping cool. And I've made several pairs of earrings. Here are the three I had time to photograph today and add to my Etsy shop. I love the textures that were achieved using the rolling mill and the richness of the patina. The ear wires are antique copper niobium, which is an alloy that is non-allergic. More to show you in a day or two. I forgot how long it took to photograph, edit and post to Etsy!


Monday, March 26, 2018
TRAIL'S END ... ANOTHER NEW BRACELET!!
It was a busy weekend ... another new bracelet that I really love. It looks great with any of my leather wrap-arounds, like the one shown. This bracelet is another project from Beadshop.com, called Trail's End. You'll find a list of supplies, a video and Episode Notes. How easy does it get!! Hopefully you'll make one and share your project.


Saturday, March 24, 2018
WIRE COILED CHAIN AND LAMPWORK BRACELET
It's been so long ... months and months ... since I've posted here. I've been a little under the weather, but finally am feeling better and getting back to the projects I love.
I just finished a bracelet that was inspired by Kate Richbourg from Beadshop.com. She makes wire work look so easy! If you haven't visited that site, there are tons of projects you'll find under their Projects heading or under Free Tip Friday (10:30 a.m. PST) or Facebook Live (Wednesdays at 10:30 PST). You can watch the broadcasts live on Facebook or later see the videos. It really pays to sign up for their newsletter for great sales.
Back to the project ... I first wound a coil with 18 gauge wire on a 4mm mandrel until I had 2 inches. Later I had to make more links to get the bracelet to fit. Plus I had a few links you'll never see! This bracelet rolls on. You could also add a clasp if you prefer.

These coils were then cut and the ends were bent up at a 90-degree angle with flat nose pliers. My first try at this ... not that easy, but not too bad. It would be much easier to use dead soft wire which neither the 18 nor 20 gauge were.

Here are some of the finished coils:

Next, I selected some of my own lampwork beads and made loops on each side of the bead with 20 gauge wire. These loops were then attached to the coiled links. Here is the finished bracelet.

I just finished a bracelet that was inspired by Kate Richbourg from Beadshop.com. She makes wire work look so easy! If you haven't visited that site, there are tons of projects you'll find under their Projects heading or under Free Tip Friday (10:30 a.m. PST) or Facebook Live (Wednesdays at 10:30 PST). You can watch the broadcasts live on Facebook or later see the videos. It really pays to sign up for their newsletter for great sales.
Back to the project ... I first wound a coil with 18 gauge wire on a 4mm mandrel until I had 2 inches. Later I had to make more links to get the bracelet to fit. Plus I had a few links you'll never see! This bracelet rolls on. You could also add a clasp if you prefer.

These coils were then cut and the ends were bent up at a 90-degree angle with flat nose pliers. My first try at this ... not that easy, but not too bad. It would be much easier to use dead soft wire which neither the 18 nor 20 gauge were.

Here are some of the finished coils:

Next, I selected some of my own lampwork beads and made loops on each side of the bead with 20 gauge wire. These loops were then attached to the coiled links. Here is the finished bracelet.

Monday, August 14, 2017
MIRRIX LOOMS' WEEK 6 CHALLENGE FINISHED!
This week I finished the Week 6 challenge early ... the weekend is free, as the new challenge is emailed every Monday! The challenge was RECYCLE. That took some thought. I have a lot of junk, but what could you use for weaving? It came to me when I was putting away laundry. My white sock drawer is jam packed full of old tennis and golf socks!
I started cutting the socks into strips and making balls. I warped my loom with that beautiful warp thread I used on the previous coasters and started making two more coasters with recycled socks! Great idea. The weaving was done so quickly by my using the shedding device again.

I started cutting the socks into strips and making balls. I warped my loom with that beautiful warp thread I used on the previous coasters and started making two more coasters with recycled socks! Great idea. The weaving was done so quickly by my using the shedding device again.

Saturday, August 12, 2017
HOLIDAY TREE ORNAMENT -- Week #4 Challenge
I finished Week 4 of Mirrix Looms' Summer Weaving Challenge. The challenge was GIVE. Make something, give it to someone or just leave it somewhere for someone to find! I was able to make two tapestry holiday tree ornaments on the warp on my loom ... and love them! I still have the second one to finish. Weaving was easy ... but finishing took some time. Hand stitching a piece of ultra-suede to the back, then sewing the tiny little seed beads three at a time to the edges. Then decorating the tree with the larger beads ... and finally attaching the hanger made with the tiny seed beads. Whew!

While they were on the loom, they looked like this:


While they were on the loom, they looked like this:


Sunday, July 23, 2017
MIRRIX LOOM SUMMER WEAVING CHALLENGE WEEKS 2 AND 3
I forgot to post the finished Queen Nefertiti bracelet, which was the weaving challenge for last week. It's beautiful. I have the option of sewing tiny seed beads to the edges, but I don't think I will ... it is finished. I love the clasp.

The challenge for week 3 was to weave with a new material. I had seen a wonderful coaster that was made in one of the Mirrix Looms weave-alongs, so that was my project. I bought fabric and tore it into one-inch strips. My other challenge was to install the shedding device onto my loom. It started with my making my own heddles. Those are the white strings you see in the photo below. I did a happy dance after attaching the handle to the shedding device and everything worked. No longer did I have to go over and under every thread. Magic!

I finished one coaster and will now advance the weaving to the back so I can make another one on the same warp threads. It's pretty rustic looking, but I kind of like it! I think next time I'll use thinner strips. The edges don't look that great, but maybe you get better with experience. Also more experience is needed in ending and adding a new color. Maybe stitching the two ends together first ... ?

I've taken the weaving off the loom. Now I have to tie and cut the ends.

Finally this afternoon I finished! And just in time, as we get a new challenge tomorrow morning. I'll try one out tonight with my drink and see how I like it!


The challenge for week 3 was to weave with a new material. I had seen a wonderful coaster that was made in one of the Mirrix Looms weave-alongs, so that was my project. I bought fabric and tore it into one-inch strips. My other challenge was to install the shedding device onto my loom. It started with my making my own heddles. Those are the white strings you see in the photo below. I did a happy dance after attaching the handle to the shedding device and everything worked. No longer did I have to go over and under every thread. Magic!

I finished one coaster and will now advance the weaving to the back so I can make another one on the same warp threads. It's pretty rustic looking, but I kind of like it! I think next time I'll use thinner strips. The edges don't look that great, but maybe you get better with experience. Also more experience is needed in ending and adding a new color. Maybe stitching the two ends together first ... ?

I've taken the weaving off the loom. Now I have to tie and cut the ends.

Finally this afternoon I finished! And just in time, as we get a new challenge tomorrow morning. I'll try one out tonight with my drink and see how I like it!

Sunday, July 16, 2017
MIRRIX LOOM SUMMER WEAVING CHALLENGE
I joined the Summer Weaving Challenge with Mirrix Looms. I wanted to make the second bracelet in the Queen Nefertiti kit I had purchased quite a while ago. The first week's challenge was to take your loom to a different spot to weave. Since I was using very very very tiny seed beads (with seven colors in their separate piles), I knew I had to choose a spot with a table and very good lighting. So I carefully took my loom, beads, needle and thread .... and glasses and clip-on magnifier .... out to a table on the patio. Oh, and also my iPad which had the pattern to follow! Early morning quiet with just birds and the sound of falling water in the fountain. Very nice.

The second week's challenge was to take the time to weave every day. That was not too difficult for me. I like weaving in the early morning. And this week I wove and listened to Wimbledon! This morning I was able to finish. It measures 6-1/2" and will shrink slightly when taken off the loom.
Here, the weaving is off the loom and I'll let it "rest" overnight. Tomorrow I can knot and cut the ends, and then attach the beautiful clasp.

Also tomorrow ... every Monday ... we will receive our new challenge for the week!

The second week's challenge was to take the time to weave every day. That was not too difficult for me. I like weaving in the early morning. And this week I wove and listened to Wimbledon! This morning I was able to finish. It measures 6-1/2" and will shrink slightly when taken off the loom.

Here, the weaving is off the loom and I'll let it "rest" overnight. Tomorrow I can knot and cut the ends, and then attach the beautiful clasp.

Also tomorrow ... every Monday ... we will receive our new challenge for the week!
Wednesday, July 5, 2017
MIRRIX LOOM WEAVE-ALONG ...... FINISHED!
I'm doing a happy dance, as I finished the tapestry bracelet and attached the button this morning! I love the black edge the seed beads created. It was such a fun project and look forward to their Summer Weaving Challenge.


Saturday, July 1, 2017
MIRRIX LOOM WEAVE-ALONG .... Continued
I just finished 7" and took my bracelet off the loom! It was so relaxing and fun to do. The Mirrix loom is just the best. 
This bad boy now needs a haircut! Then the next step is to cut the black ultra suede the bracelet is sitting on. It needs a tiny edge to stitch to the weaving. After that 16/0 seed beads are stitched around all edges, three seed beads to every stitch. I wonder how long that will take?!!! A loop and button are sewn on for the closure.
Look for my next post to see the finished bracelet!!!!! I'll be doing a happy dance, for sure.

This bad boy now needs a haircut! Then the next step is to cut the black ultra suede the bracelet is sitting on. It needs a tiny edge to stitch to the weaving. After that 16/0 seed beads are stitched around all edges, three seed beads to every stitch. I wonder how long that will take?!!! A loop and button are sewn on for the closure.
Look for my next post to see the finished bracelet!!!!! I'll be doing a happy dance, for sure.
Sunday, June 25, 2017
MIRRIX LOOM WEAVE-ALONG #24
Wow, it's been so long since I posted here! Let me tell you, I've been busy. Completing more of those unfinished pieces, mostly bracelets. As soon as I have time to take photos and get a few into my Etsy shop, I'll show you what I've made. I'm trying to build up my inventory and hopefully do well during the upcoming holiday sales.
Right now I'm participating in a Mirrix Loom weave-along to make a tapestry bracelet. I've done a few on my loom in the past with seed beads, but this one teaches you several new techniques: Slit Tapestry where you weave two different color threads in opposite directions creating a straight line where they meet; Pick and Pick creating stripes with two different color threads. The concept is easy, but it's so tricky to do correctly! Wavy Lines weaving one thread color back and forth once, then repeating with a second color.
Here's what I've done so far. This is about 2-1/2 inches, and I need to weave 7 inches. Then we have to stitch a piece of ultra-suede to the back, which covers all the ends sticking out, sew 16/0 (Yikes!) seed beads along all edges, and add a loop and button for the closure. Who knew weaving could be so much fun. My next project will be making coasters out of strips of material. There was a Mirrix Loom weave-long a while ago that has my perfect project .... can't wait to try it.

Right now I'm participating in a Mirrix Loom weave-along to make a tapestry bracelet. I've done a few on my loom in the past with seed beads, but this one teaches you several new techniques: Slit Tapestry where you weave two different color threads in opposite directions creating a straight line where they meet; Pick and Pick creating stripes with two different color threads. The concept is easy, but it's so tricky to do correctly! Wavy Lines weaving one thread color back and forth once, then repeating with a second color.
Here's what I've done so far. This is about 2-1/2 inches, and I need to weave 7 inches. Then we have to stitch a piece of ultra-suede to the back, which covers all the ends sticking out, sew 16/0 (Yikes!) seed beads along all edges, and add a loop and button for the closure. Who knew weaving could be so much fun. My next project will be making coasters out of strips of material. There was a Mirrix Loom weave-long a while ago that has my perfect project .... can't wait to try it.

Sunday, April 16, 2017
UNFINISHED PROJECTS
I keep telling myself, "You can't make anything new until you've finished all your old projects!!" Does anyone else have that same problem? So that's my goal for the next few days. Yesterday I smelled up my kitchen with liver of sulphur and added patina to my copper pieces. Today I'm working on ear wires. Only two pairs of earrings done ... quite a few to go ...
My finished earrings .... These were made with skeleton leaves run through the rolling mill.
 These were textured using a brass plate run through the rolling mill.
 Quite a few more earrings waiting for ear wires.
 I also have two pendants that have sat around collecting dust ... They need chains. And a few very cute hoops that were stretched using the rolling mill. They will turn into earrings, maybe with some dangles.

My finished earrings .... These were made with skeleton leaves run through the rolling mill.


Thursday, April 13, 2017
MY NEWEST LEATHER BRACELET
My newest leather bracelet is made from 5x2mm light brown Indian 3-braid leather. It's a double-wrap bracelet and has a great feather slider that fits over both leather straps. And I love that SW design magnetic clasp and the rest of the sliders. It fits a 6-7 inch wrist. A definite winner!


Subscribe to:
Posts (Atom)