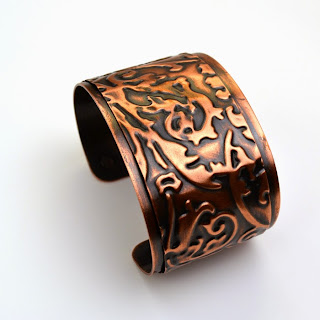
Here are the finished copper cuffs I promised to show you. They were treated with liver of sulfur patina, then sprayed with enamel to protect the metal surface.
Wednesday, February 18, 2015
Friday, February 13, 2015
My Latest Project -- COPPER CUFFS
I first saw these copper cuffs in Art Jewelry magazine (September 2014), and only yesterday did I gather all my supplies and attempt to make a few. The article was written by Eva Sherman, a very well-known jewelry artist. She had taken a class taught by Charles Lewton-Brain, author of the wonderful book, Foldforming. She asked him -- if she created a brand new foldforming technique, could it be named after her. Yes, he said. Hence, the Sherman Fold.
The Sherman Fold is created using round nose pliers, twisting the edge of your metal piece until you like it. Twisting, annealing, twisting, annealing, twisting ......
I started with a piece of 30 gauge copper, 2" wide x 8" long, and twisted the metal around the entire piece.
You can see in the photo I twisted with my pliers pointing straight. After you anneal the metal, you twist with your pliers pointing to the right and go around the whole piece. Anneal. Then you twist with the pliers going to the left. Anneal. Repeat these three steps. You need to lightly hammer the metal with a rawhide mallet after each of these steps to flatten it so it's manageable.
Remember ... You are having fun. Here's how your piece looks. What??!!!
Eventually, you will put your piece in the pickle pot, brush and rinse it, and it becomes something really nice.
In the meantime, you prepare your base piece, which is 20 gauge copper, 1-1/2" wide and 6" long. Of course, the length depends on the size of your wrist. You cut your 30 gauge piece 1-1/4" wide by 6" long (the same length as the 20 gauge).
You can see by this photo that I have cut the two pieces ... and have the leftovers to make other projects! I stamped the two hearts to appear in the inside of the cuff.
Next, trim the sharp corners and round them with a file or sandpaper. Now it's time to shape the two pieces. You need to work harden the 20 gauge piece on a bracelet mandrel(or baseball bat or whatever you have). Then lightly shape the 30 gauge piece and center it on the base piece. You can use painters' tape to hold it in place. The two pieces get riveted together, so you need to drill or punch two holes on each end, keeping 1/8" from the edge. I used copper nail head rivets that I inserted from the inside of the cuff, trimmed to a credit card length and then secured the rivet on the top side of the cuff.
Here's the Sherman Fold cuff put together. It will get a patina treatment with liver of sulfur later. I'll be sure to post a photo of the finished piece.
With the leftover piece that was cut off, I made a narrower 1" wide cuff.
Here's the third cuff I made using the Sizzix BIGkick machine and an embossing folder. I love it too!
Subscribe to:
Comments (Atom)


